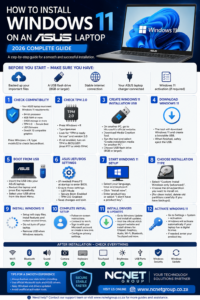
How to Install Windows 11 on an ASUS Laptop in 2026
Installing Windows 11 on an ASUS laptop is a straightforward process if the laptop meets Microsoft’s hardware requirements and you prepare the computer correctly before starting. Windows 11 includes several security and performance improvements over earlier versions of Windows, but the installation process requires certain hardware features such as TPM 2.0, Secure Boot capability, a compatible 64-bit processor, sufficient storage, and enough memory.
This guide explains how to install Windows 11 on an ASUS laptop in 2026. It covers preparation, checking compatibility, creating a Windows 11 installation USB drive, changing ASUS boot settings, performing a clean installation, completing the initial Windows setup, installing drivers and updates, and troubleshooting common installation problems.
1. Before You Start
Before installing Windows 11, it is important to prepare the laptop. Installing Windows can potentially remove applications, settings, and personal files, particularly when performing a clean installation.
Make sure you have the following:
- An ASUS laptop that supports Windows 11.
- A reliable internet connection.
- A USB flash drive with at least 8 GB of storage.
- Access to another working computer if you need to create the installation USB.
- Your Windows activation information, if required.
- A backup of your important files.
- The laptop’s power adapter.
It is strongly recommended that you connect the ASUS laptop to its charger throughout the installation. The installation process can take some time, and losing power while Windows is being installed could cause problems.
2. Back Up Your Important Files
Before changing the operating system, back up your important information.
Personal files that should be backed up include:
- Documents
- Pictures
- Videos
- Music
- Desktop files
- Downloads
- School or work documents
- Browser bookmarks
- Email files
- Financial records
- Software installation files
- Any other information that you cannot afford to lose
You can back up your files to an external hard drive, USB drive, another computer, or a trusted cloud-storage service.
Do not assume that your files will automatically be preserved during installation. A clean installation can erase the Windows partition and everything stored on it.
If the ASUS laptop contains important information, make the backup before proceeding.
3. Check Whether Your ASUS Laptop Supports Windows 11
Windows 11 has minimum hardware requirements.
A compatible computer generally needs:
- A compatible 64-bit processor.
- At least 4 GB of RAM.
- At least 64 GB of storage.
- UEFI firmware.
- Secure Boot capability.
- TPM 2.0.
- A DirectX 12-compatible graphics device with a WDDM 2.0 driver.
- A suitable high-definition display.
However, meeting only the minimum requirements does not necessarily mean the computer will provide an ideal experience. More RAM and available storage are recommended for comfortable everyday use.
ASUS laptops released in recent years are generally designed to support Windows 11, although compatibility depends on the exact model and hardware configuration.
4. Check TPM 2.0
TPM stands for Trusted Platform Module. TPM 2.0 is an important Windows 11 security requirement.
To check TPM from Windows:
- Press Windows + R.
- Type:
tpm.msc
- Press Enter.
A TPM management window should appear.
Look for information indicating that the TPM is ready for use and check the specification version.
If TPM is not available, it may be disabled in the ASUS UEFI/BIOS settings rather than physically missing.
On ASUS systems, TPM may appear under names such as:
- TPM
- Security Device
- Intel PTT
- Intel Platform Trust Technology
- AMD fTPM
The exact name depends on the processor and ASUS laptop model.
5. Check Secure Boot
Windows 11 also expects Secure Boot capability.
To check it from Windows:
- Press Windows + R.
- Type:
msinfo32
- Press Enter.
- Look for Secure Boot State.
If it says On, Secure Boot is already enabled.
If it says Off, Secure Boot may be supported but disabled.
If the computer is using Legacy BIOS/CSM mode, you may need to switch to UEFI mode before Secure Boot can be enabled. This should be done carefully because changing boot configuration on an existing Windows installation can sometimes prevent Windows from starting.
6. Check Your Windows Version
If your ASUS laptop currently runs Windows 10, check which edition you have before upgrading.
Go to:
Settings → System → About
Look for the Windows edition.
For example, you may have:
- Windows 10 Home
- Windows 10 Pro
When upgrading, it is generally important to install the corresponding Windows 11 edition so that activation can be handled correctly.
7. Decide Between an Upgrade and a Clean Installation
There are two main ways to install Windows 11.
Option 1: Upgrade
An upgrade installs Windows 11 over the existing Windows installation.
Depending on compatibility and the installation method, you may be able to keep:
- Personal files
- Applications
- Settings
This is normally the easiest option for someone who wants to move from Windows 10 to Windows 11 without starting over.
Option 2: Clean Installation
A clean installation removes the existing Windows installation and installs a fresh copy of Windows 11.
This is useful when:
- The laptop has serious software problems.
- Windows is corrupted.
- The computer has accumulated unnecessary software.
- You want to start with a completely fresh system.
- You are replacing the existing operating system.
A clean installation requires more preparation because data and applications may be removed.
For most users with a functioning Windows 10 ASUS laptop, an upgrade is the safer first choice. A clean installation is better when you specifically want a fresh system.
8. Download Windows 11 Installation Media
Use Microsoft’s official Windows 11 download resources rather than downloading modified Windows installation files from unknown websites.
Microsoft provides installation options including:
- Windows 11 Installation Assistant.
- Windows 11 installation media.
- Windows 11 ISO files.
For a clean installation, the installation media option is particularly useful because it allows you to create a bootable USB flash drive.
Use a USB flash drive with at least 8 GB of capacity. The USB drive will normally be erased while creating the installation media, so do not keep important files on it.
9. Create a Windows 11 Bootable USB
Insert the USB flash drive into a working computer.
Download and run Microsoft’s Windows 11 media-creation software.
Follow the instructions displayed by the program.
When asked to select the installation media, choose the option for a USB flash drive.
Select your USB drive.
The tool will download the required Windows 11 files and create a bootable installation drive.
The amount of time required depends on your internet speed and USB drive performance.
When the process finishes, safely eject the USB drive.
10. Connect the USB to the ASUS Laptop
Insert the newly created Windows 11 installation USB into the ASUS laptop.
Make sure the laptop is connected to its charger.
Turn the laptop off completely.
You are now ready to boot the computer from the USB drive.
11. Open the ASUS Boot Menu
ASUS laptops commonly provide a boot-menu key that allows you to select a boot device during startup.
Turn on the laptop and repeatedly press Esc as soon as the ASUS logo appears.
On supported models, this should open the boot-device selection menu.
Select the USB flash drive.
If the USB drive is not displayed, enter the UEFI/BIOS settings and check the boot configuration.
The exact keys and menu layout can vary between ASUS models, so the laptop’s specific manual may be necessary if the normal boot-menu method does not work.
12. Enter ASUS UEFI/BIOS Settings
If necessary, restart the laptop and enter the UEFI/BIOS setup.
On many ASUS laptops, F2 is used to enter the BIOS/UEFI setup during startup.
Inside the firmware settings, check the following:
- UEFI boot mode.
- Secure Boot.
- TPM or firmware TPM.
- Boot order.
- USB boot support.
Do not change settings randomly. BIOS/UEFI settings control important hardware and boot functions.
If you are unsure about a particular setting, check the documentation for your exact ASUS model.
13. Start Windows 11 Setup
After selecting the USB drive, the laptop should boot into the Windows Setup environment.
You will normally see a screen asking for:
- Language to install.
- Time and currency format.
- Keyboard or input method.
Select the appropriate options and click Next.
Then select:
Install now
Windows Setup will begin loading.
14. Enter Your Windows Product Key
Depending on your laptop and installation circumstances, Windows Setup may ask for a product key.
If you have a valid product key, enter it.
If the ASUS laptop already has a digital Windows licence, you may be able to select:
I don’t have a product key
Windows can then be activated later when the computer connects to the internet, provided the device has a valid digital licence for the edition being installed.
If you previously had Windows 10 Home, for example, install the appropriate Windows 11 Home edition.
Do not use unofficial activation tools or pirated product keys.
15. Select the Windows Edition
If Setup asks you to choose an edition, select the edition for which you have a valid licence.
Common editions include:
- Windows 11 Home
- Windows 11 Pro
Choosing an edition that does not match your licence can cause activation problems later.
16. Accept the Licence Terms
Read the Microsoft software licence terms.
If you agree, select the option indicating that you accept the terms and continue.
Click Next.
17. Choose the Installation Type
Windows Setup may offer options similar to:
Upgrade
or
Custom: Install Windows only
For a clean installation, select:
Custom: Install Windows only
Be very careful at the next stage.
18. Select the Installation Drive
Windows Setup will display the partitions and drives available on the ASUS laptop.
You may see several partitions, including:
- EFI system partitions.
- Recovery partitions.
- Primary Windows partitions.
- Manufacturer recovery partitions.
If performing a clean installation, you need to understand that deleting partitions can permanently erase the information stored on them.
If you have already backed up your files and deliberately want to completely erase the existing Windows installation, you can remove the relevant existing Windows partitions and install Windows into the resulting unallocated space.
However, do not delete partitions simply because they look unfamiliar.
ASUS recovery partitions may contain tools or recovery information that could be useful later.
If you are unsure which partition to use, stop and verify the configuration before deleting anything.
19. Install Windows 11
After selecting the appropriate destination, click Next.
Windows Setup will begin copying files.
The computer may:
- Copy Windows files.
- Install features.
- Install updates.
- Prepare the system.
- Restart several times.
Do not turn off the laptop during this process.
If the computer restarts and returns to the USB installation screen, remove the USB drive or select the internal Windows drive as the boot device.
20. Complete the Windows 11 Initial Setup
After installation, Windows will display the initial setup process.
You may be asked to select:
- Country or region.
- Keyboard layout.
- Additional keyboard layout.
- Network connection.
- Computer name.
- Microsoft account.
- Privacy settings.
- Device permissions.
- Backup preferences.
Follow the instructions displayed on the screen.
Connect the laptop to the internet when prompted so Windows can obtain updates and activate the installation.
21. Sign In With a Microsoft Account
Windows 11 may encourage you to use a Microsoft account.
A Microsoft account can provide access to services such as:
- OneDrive.
- Microsoft Store.
- Windows backup features.
- Microsoft account synchronisation.
- Other Microsoft services.
If your organisation or school provides a managed account, use the appropriate account supplied by that organisation.
Be careful when signing into accounts on a shared computer.
22. Install Windows Updates
Once you reach the Windows desktop, immediately check for updates.
Open:
Settings → Windows Update
Select:
Check for updates
Allow Windows to download and install available updates.
The laptop may restart several times.
Continue checking for updates until there are no important updates remaining.
This step is particularly important because a newly installed Windows version may not contain all of the latest security updates and hardware drivers.
23. Install ASUS Drivers
After installing Windows 11, check the ASUS support resources for your specific laptop model.
Important drivers may include:
- Chipset drivers.
- Graphics drivers.
- Wi-Fi drivers.
- Bluetooth drivers.
- Audio drivers.
- Touchpad drivers.
- Camera drivers.
- ASUS system-control utilities.
- BIOS/UEFI updates where appropriate.
Do not install random drivers from unknown websites.
Use Windows Update and ASUS’s official support resources whenever possible.
First identify the exact ASUS model. The model information is normally printed on the laptop, its packaging, or available in Windows under the system information.
24. Check Device Manager
Open:
Start → Device Manager
Look through the hardware list.
If a device has a yellow warning symbol, Windows may not have the correct driver installed.
Common devices that may need attention after installation include:
- Network adapters.
- Audio devices.
- Display adapters.
- Touchpads.
- Bluetooth devices.
Install the appropriate ASUS or manufacturer driver and restart the computer.
25. Activate Windows 11
Open:
Settings → System → Activation
Check the activation status.
If the laptop previously had a valid digital Windows licence and the correct Windows edition has been installed, Windows may activate automatically once connected to the internet.
If activation does not occur, verify:
- The Windows edition is correct.
- The laptop is connected to the internet.
- The device previously had a valid licence.
- The product key, if applicable, has been entered correctly.
Avoid unofficial activation programs because they can introduce malware and create security problems.
26. Install Your Applications
Once Windows and the drivers are working correctly, reinstall your required applications.
These might include:
- Microsoft Office or Microsoft 365.
- Web browsers.
- Antivirus/security software.
- PDF readers.
- Communication applications.
- Printer software.
- Accounting applications.
- School or work applications.
- Graphics and design software.
Download applications from their official websites or trusted app stores.
Avoid installing large numbers of unnecessary programs immediately after installation.
27. Restore Your Personal Files
After confirming that Windows 11 is operating correctly, restore your backed-up files.
Copy your:
- Documents.
- Photos.
- Videos.
- Music.
- Work files.
- School files.
- Browser data.
- Other personal information.
Do not immediately delete your backup. Keep it until you are confident that everything has been restored successfully.
28. Configure Windows Security
Windows 11 includes built-in security features.
Open:
Settings → Privacy & security → Windows Security
Check that the important security features are enabled.
Also make sure that Windows Update is functioning correctly.
If you use third-party security software, ensure that it is compatible with Windows 11.
Do not install multiple full antivirus programs at the same time because they can interfere with each other.
29. Check ASUS Function Keys
After installing Windows 11, test the laptop’s special function keys.
Depending on the ASUS model, these may control:
- Volume.
- Screen brightness.
- Keyboard backlighting.
- Touchpad.
- Wireless communication.
- Microphone.
- Display output.
If some function keys do not work, the appropriate ASUS utility or driver may not yet be installed.
30. Check Wi-Fi, Bluetooth, Sound and Camera
Before considering the installation complete, test the main laptop functions.
Connect to Wi-Fi.
Test Bluetooth.
Play an audio file.
Test the microphone.
Open the camera application.
Test the touchpad.
Connect a USB device.
Test the display brightness controls.
If any function does not work, check Windows Update and the ASUS support page for the correct driver.
31. Troubleshooting Common Problems
The USB drive does not appear
Try another USB port.
Restart the laptop and open the ASUS boot menu again.
If the USB drive still does not appear, recreate the installation media using a reliable USB drive.
Also check whether USB booting is enabled in UEFI settings.
Windows says the computer does not meet requirements
Check:
- TPM 2.0.
- Secure Boot.
- UEFI mode.
- Processor compatibility.
- RAM.
- Storage.
TPM and Secure Boot are sometimes disabled in firmware even though the hardware supports them.
Do not automatically bypass Windows 11 hardware requirements simply to force an installation. Unsupported installations can have security, driver, update and stability consequences.
Wi-Fi does not work after installation
Use another computer or another internet connection to download the correct ASUS network driver.
Transfer the driver to the ASUS laptop using a USB drive and install it.
Once Wi-Fi is working, run Windows Update.
The laptop keeps booting from the USB
Remove the installation USB after Windows has copied the required files and the computer restarts, or select the internal Windows drive from the boot menu.
Windows activation fails
Confirm that the installed Windows edition matches the licence associated with the laptop.
If the laptop originally came with Windows Home, installing Windows Pro will not necessarily activate it using the Home licence.
The laptop becomes slow
Install Windows updates and ASUS drivers.
Check Task Manager for applications consuming excessive CPU, memory or disk resources.
Remove unnecessary startup applications.
Ensure that the laptop has adequate free storage.
Also check whether Windows is still completing background updates.
32. Final Checklist
After completing the installation, check the following:
- Windows 11 is activated.
- Windows Update has been completed.
- ASUS drivers are installed.
- Wi-Fi works.
- Bluetooth works.
- Sound works.
- Camera works.
- Microphone works.
- Touchpad works.
- Keyboard works.
- Function keys work.
- Screen brightness controls work.
- Important applications are installed.
- Personal files have been restored.
- Windows Security is active.
- Important passwords and accounts are secure.
- A backup system is configured.
Conclusion
Installing Windows 11 on an ASUS laptop in 2026 can be completed successfully by preparing the computer carefully and following the installation process step by step. The most important preparation is to back up personal files, confirm that the ASUS laptop meets Windows 11 requirements, and create installation media using Microsoft’s official Windows resources.
For a laptop that is already running a supported version of Windows and is working properly, an upgrade is usually the least disruptive option. A clean installation is more appropriate when you want to completely refresh the laptop or resolve serious software problems, but it requires careful handling of the disk partitions because personal data and existing applications can be erased.
After Windows 11 has been installed, do not consider the process finished until Windows Update and the appropriate ASUS drivers have been installed. Checking Device Manager, activating Windows, testing Wi-Fi and other hardware, and configuring Windows Security are important final steps.
By taking a backup before installation and using official Microsoft and ASUS software, you can greatly reduce the risk of data loss, driver problems and security issues while setting up Windows 11 on your ASUS laptop.
Windows Installation: A Step-by-Step Guide
Laptop Upgrading: Enhancing Performance and Functionality